Proposed Development in Chappellton

The other towns on the BS&T seemed to almost fall into place as far as building and street locations are concerned.  Once those things are determined the rest of the scenery just happens.  Chappellton, however, continues be a challenge.  It has gone through many changes since the layout was constructed as I tried to find track and street arrangements that I was happy with.  I am happy with it to this point, but I wanted to try something different here.  I wanted to have part of the town raised above the railroad with the station building on the raised portion and the passenger platform below.

ctbuildings-2-20081102So, I’m trying some things to see how I can go about doing that, but they all lead to one fact.  I have to move the tracks, yet again!  There is not enough room between the main line and the station siding for the walls and other structures required to support a raised section of town.  So, one of these evenings when I go into the room to do some work I know I’ll be tackling that project.

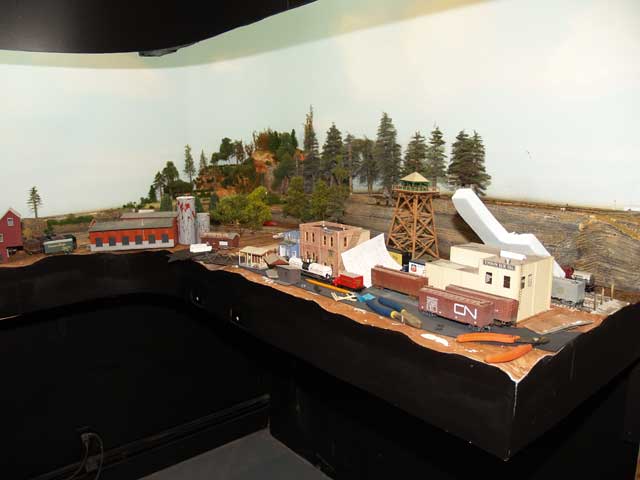
If you’ve been a very observant regular reader of this blog you might notice there are several “new” structures in Chappellton (the row of buildings just left of center in the first photo).  I was lucky enough to be in the right place at the right time when we were at the Truro train show a few weeks ago and bought several structures from Dara at a great price.  These will certainly help to make the town look a little less barren.

ctbuildings-1-20081102

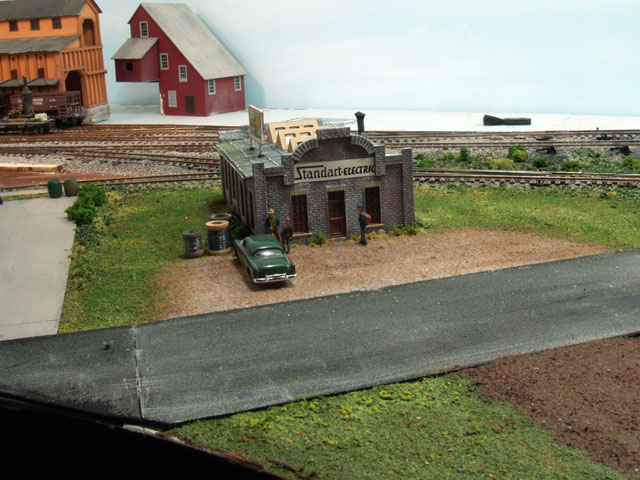
The second photo shows two other structures (the large brick and the sand colored building near the center of the photo) that were built for the 5th Street Industrial District UMG modules.  They may as well be on my layout between shows rather than collecting dust somewhere.  Plus there’s a greater chance they’ll get finished than if there were packed away.

Next time I’ll have an update on a recent operating session on the BS&T.  Until then…

Scott

Changes in Derwin’s Drop

Here are some pictures to prove I have been working on the layout.  They aren’t dramatic changes, but change is change.

ddmycoal-20081102One of the last areas of Derwin’s Drop to be finished is the mine.  I’ve started by layering foam to create the base of a mountain.  The rest of the mountain will be painted on the backdrop.  I’m not sure who will paint it, or when.

The next step will be to carve the foam mountain to create rock details and then cover it with plaster and maybe a few rock castings.  The final bits will be coloring, grass, trees (of course) and other various details that would be found around a mine.

I know once I get into working on this area in earnest it won’t take long to finish.  So stay tuned!

ddengineshed-1-20081102This engine shed is a structure I made for our 5th Street Industrial District modules for the UMG.  Rather than put the structure in a box between shows I decided I could put it to good use as the engine shed for the service track in Derwin’s Drop.

I decided I wanted the back of the shed to look unkempt and wild so I added several different types of shrubs and bushes.  I used lichen, foliage clumps, and polyfiber coated with ground foam to make this area look “wild”.  A scattering of junk later will further add to the untidy look.

ddengineshed-2-20081102

You get a different perspective of the back of the shed in this photo. The area in the foreground is not intended to look like cut rock.  It is where the lift out is placed to cross the great divide of the doorway.

With Chemical Hazards in front of the shed it is difficult to get a natural angle when photographing it.  There are too many things in the way.  My little photographer will have to climb a tree later to get a bird’s eye view of the scene.

Well, that’s it for this update.  I’ve been working in other areas of the layout as well and I’ll have an update on that soon.  I never really know what I am going to work on when I first enter the layout room.  I intend to do one thing but usually end up working on something else.

’til next time!

Scott

BackDrops in Tidewater and Stevenville

A while ago I wrote about the backdrop I put in Tidewater from Sceniking. I had two sets from them that totaled about 8′, but they didn’t have a set to extended them until recently. Les, at Sceniking, sent me an email a few weeks ago saying that they had finished developing the new set, so I ordered it on the spot. It arrived this week and I started working on it the other evening.

The new set mated perfectly with the old one. As I moved toward the end of the yard where the tracks enter from Chappellton I hoped I’d be able to do something so the opening in the backdrop would look ok. It almost worked out perfectly. A building ended about 4 inches before the opening, then there was a street that I could easily cut out for the opening. But the building on the next sheet started over the opening. Bummer!

I moved things around trying to figure out how I could get the two buildings to be on each side of the opening. I decided to scan the first sheet and made two copies of it in the hopes that I could extend the first building enough to get it to end at the track opening. It’s not a perfect match, but it worked out quite well. It’s hard to see the extension in these photos. It is the white building at the far right of the top photo. The 4th, 5th, and 6th windows from the left are the scanned/printed section.  I’ve cropped and enlarged it, below.

The next step is to start adding some 3D details to the backdrop like loading docks, bushes, and grass.

There were a few sheets of backdrop left over so I trimmed the buildings and trees from the sky and placed them around Dickie Clothing in Stevenville. They certainly enhance the area!

Later!

Scott

A Tug in the Harbour

tug-6.jpgChappellton Harbour got a new addition over the weekend – a 45′ Tug from Frenchman River Model Works.

You can read about assembling this kit at the Scratchbuilder’s Guild.

I needed a tug for the car float in Chappellton and this kit looked like a great choice. However, after I placed it in position it looks very small next to what I was going to use as a starting point for the car float. So, I either need a larger tug, or a smaller car float.

It might not be so bad after I pour the epoxy to simulate water. I will leave the float where it is and remove the tug. I’ll pour the water to about 1/4″ thickness. Hopefully the tug will appear larger next to the float when I put it back in place.

What do you think?

2008-03-16-tug-4.jpg

Scott

Derwin’s Drop Scenery

I took advantage of the weather and Kim’s work schedule to do some more work in Derwin’s Drop over the weekend. I was also able to get some photos for future articles at the Scratchbuilder’s Guild. I’m pleased to say that I’m about half done of the basic scenery in Derwin’s Drop now. I’m still not certain what to do with the mine area, but I’m sure something inspiring will happen in the next little while.

Here are some pictures I took last Sunday evening of my weekend’s work…

2008-03-02-derwinsdrop.jpgThis is an overall view of the town looking west. From left to right is the Freight Shed, Standard Electric with the mine behind and a cabin in front, and Chemical Hazards on the far right. There are a couple vacant lots that are calling out for buildings but I have no idea what to put there yet. There will be a train station behind the Freight Shed some day.

2008-03-02-freightshed-1.jpgSo, here are a couple closer shots of the Freight Shed. It looks like it’s getting close to the end of the work day and the guys are taking a break before heading home for the day. They had a long day of loading and unloading “stuff”. Their beds will feel good tonight.

Chet, the night watchman is just coming on duty.

2008-03-02-standardelectric-2.jpgThe mail man is doing his rounds a little late today. Fred and Bill haven’t seen each other in a while and are catching up outside. Standard Electric used to manufacture electrical components for the housing industry, but have fallen on hard times lately. Allan Lectric, the owner, hasn’t made up his mind whether he wants to “go big or stay home”.

2008-03-02-ch-2.jpg Chemical Hazards can be a very dangerous place to work. They don’t seem to care about regulations. We can see how they get away with it. Clayton, the Plant Manager, is greeting the inspector from Environment Canada, Bernie McBribe. I’m sure there’s a big bag of cash and a bottle of Clayton’s “Special Blend” inside somewhere.

2008-03-02-ch-3.jpgYou wouldn’t even have to go inside the gate to know that this place would not pass an Environmental Assessment. There’s nothing left alive inside the fence!

Drums of “God only knows what” are scattered everywhere. It’s a wonder these guys are still alive! I’d really hate to see what their kids look like!

2008-03-02-thecabin.jpg

Old Bentnose Willie is taking his life in his hands living so close to Chemical Hazards! There’s only a scraggly fence between him and an uncertain future. It’s a good thing his nose is so bent that no woman would ever have him. Think of what their kids would be like after years of ingesting that ground water!

Well, that’ll be it for scenery updates for this week, I think. I have to get the layout into operational condition for the visit by the Moncton guys. After a few weeks of scenery work that’s going to take a while! Plus I need to work out an operations scheme for the biggest crew I’ve ever had on the BS&T!

Later!

Scott

More on Ballasting

I’ve finished my series about ballasting at the Scratchbuilder’s Guild. Have a look at it with this link and let me know what you think.

ballast-step-15.jpg

The next step will be the grass, bushes, and other scenic details. Once these are done things should blend together and look a whole lot better.

Later!

Scott

Derwin Drop Scenery – The Mad Rush

2008-01-30-dd.jpg

I’ve been working in Derwin’s Drop a lot this week. Why the rush, you ask? We have some guests coming from Moncton on Saturday for a day of layout visits and operating, so I wanted to get rid of the last little bit of all-blue foam on the layout. With the recent changes to the track arrangement there I was ready to start scenery.

2008-01-30-road-1.jpg

Anyway, last evening I painted the road and the base for the freight shed. I am planning to put a layer of plaster over the road to try Harold Minkwitz’s cracked road method, but I won’t get that done before Saturday, and I wanted to tone down the black foam. I dry-brushed a coat of “Linen” and “Grey” acrylic tole paints over the road. It seems to work, for now.

2008-01-30-road-2.jpg

The “Linen” tole paint looks pretty good for concrete as well, so I painted the freight shed lot with it. Then scribed some expansion joints and added a cost of india ink/alcohol mix.

2008-01-30-fs.jpg

I painted the fence at Chemical Hazards. It’s hard to tell that it’s just a bunch of 2.5″ air nails. They look fairly good as a board fence.

2008-01-30-ch.jpg

The surrounding “land” got a coat of dark and light brown tole paints to get rid of the blue foam look. Grass, secondary roads, bushes and stuff will come later.

I’m happy with the area for now. It’s far from finished, but it looks a lot better than it did before.

I’ll have a post about our Moncton visitors next week. Until then, stay warm (P.E.I. Hit By Major Ice Storm)! Hopefully Derwin gets his power back before Saturday so we can operate the Canadisle Rail. Oh, and so his family can eat and be warm too!

Scott

Grade Crossings and Roads

I’ve been using a different method, for me anyway, for roads on the BS&T.

On my old layout I used a lot of plaster to build up streets and roads. It was a lot of work to try to get them smooth enough to resemble a road. Then if something happened to chip the plaster you have an odd coloured pothole.

So, I used a tip I read on Harold Minkwitz’s web site (Inpirations – Dirt Roads, Bushes, and Grass). He uses 1/8″ craft foam for streets. You’ve likely seen examples of these streets in other posts on the BS&T Blog.

One of the best uses of this product is for grade crossings. The foam is the same thickness as code 100 rail (sorry for all you more scale conscious model railroaders using smaller rail <wink>) so it makes perfect grade crossings. All you need to do is hold the foam in place and run a sharp knife along the rail to get a perfect fit. Anywhere you need a gap for wheel flanges just trim the foam a little narrower.

2008-01-28-gradecrossing-2.jpg

This grade crossing (below) in Derwin’s Drop would have been almost impossible to do with plaster. I wouldn’t have even attempted it. But I did this the other evening in about 20 minutes.

2008-01-28-gradecrossing.jpg

The wheel flange clearance may be a little tight, but the foam gives enough that I don’t think it’ll give me any trouble. I ran an S-4 through this about 10 times, at different speeds from a crawl to normal speed, without a hitch.

I’m going to try Harold’s method of making old cracked pavement in this area. He applies a thin layer of coloured plaster over the foam, paints it to simulate old asphalt, then presses on it causing the plaster to crack. Instant stress cracks. Then pick a few pieces out to make potholes.

Later,

Scott

More Work in Derwin’s Drop

Well, last evening I did a little more work in Derwin’s Drop. I mentioned in my last update that I was going to move the ground throws closer to the fascia, and therefore the operator.

2008-01-28-grndthrows-1.jpg

I installed longer push rods for the ground throws and routed then between the ties in neighbouring tracks. This required cutting the joiner sections between the ties so the push rod would move freely. Fortunately I was able to get a straight path under the adjoining rails.

2008-01-28-grndthrows-2.jpg

Yes, I have a mixture of turnouts on my layout. I know some people will only use one brand or the other, but I’m cheap, err… frugal. I take whatever I can get for the least amount of money. In this case the turnouts were free.

Anyway, now even Derwin can operate at Derwin’s Drop, unless there’s a derailment at the back. But that’ll never happen! Not on the BS&T! No way! HA!

Scott

The Earth Moves in Derwin’s Drop

As I mentioned in my operations report on January 19, after the session we talked about some possible changes to the track arrangement in Derwin’s Drop. Since I only have three weeks before the next operating session I decided I’d better get started. So over the weekend the earth started moving in Derwin’s Drop.

The track arrangement in Derwin’s Drop has two limitations. the west and east sides of the town both have bridges/liftouts so the approach track to those must remain exactly where it is. I removed all the track except the last 6 inches or so of those approaches. Then I started rearranging track trying to find a better track plan.

Reaching most of the turnouts in Derwin’s Drop has proven to be difficult for most operators. There are only three industries, Freight Shed, Chemical Hazards, and MyCoal Mine. The mine was the challenge since the first turnout for the mine was off the rear passing siding and there were two turnouts off of that. Each turnout was progressively farther away from the operator. So my goal was to reduce the reach and make it easier for folks to operate there.

After much finagling of track I ended up with much the same arrangement. However, I now have only two, longer, sidings at the mine so the turnouts are closer to the fascia. To further reduce the reach I installed ground throws a few inches away from the turnouts using a long wire connected to the turnout’s throwbar. If cars are parked on the siding it will be difficult to reach this groundthrow. I may put a longer wire and move the ground throw even closer – to the other side of the tracks at the bottom of the photo.

dd-groundthrow.jpg

Another thing that bothered me about the area was that I did not have room to place a train station in he town. I was able to move the Freight Shed a little farther east so I am now able to place a small train station where it used to be.

I’ll put this arrangement to the test at the next operating session (which might be this weekend if the guys from Moncton come over), and see how it goes. There’s always the stand-by milk crate for any vertically challenged operators.

ddmess.jpg

Meanwhile, I have a lot of cleaning to do now. Besides the clutter left behind in Derwin’s Drop due to all the earth moving, the original town of Derwin’s Drop was temporarily relocated to Kenville!

kenville-ahhhhh.jpg

Later!

Scott