Wayfreights are the blood supply system of the Bayside and Tidewater Railway. Wayfreight crews move freight cars around the railroad from one town to another town or yard. Without wayfreights nothing would get picked up or delivered.
Wayfreights on the BS&T start their shift in either Bayside or Tidewater yards at the start of the operating session. Wayfreight crews must build their own trains. They begin by hauling tracks of cars, pulling off the ones they require for their departing train. Once they have all the cars for their train, the crew then sorts them by destination. This makes it much simpler when they get to a town since all the cars for that town are in one block.
Having the wayfreight crews build their trains at the start of the session allows local crews time to get cars pulled that are leaving on the first wayfreight to arrive. For Stevenville and Derwin’s Drop this would be the West Bound Wayfreight out of Bayside and for Chappellton and Kenville it would be the East Bound out of Tidewater.
I’ll use the most recent run of the West Bound Wayfreight from Bayside to Tidewater as an example.
Brian started the session building this train in Bayside Yard. He used the Yard Order sheet to determine which cars to put on his train. Once he had the cars pulled (12 leaving Bayside) and sorted he parked the yard switcher on the service track and pulled the pair of GP-35’s out of the engine house to use as power for the train. He was ready to leave about 30 minutes after the session started. He checked with the Stevenville Local crew to make sure he was clear to leave Bayside and head into Stevenville.
We don’t use radios or a dedicated dispatcher on the BS&T. I act as “roaming dispatcher” and if I’m in the area when permission to proceed is required I’ll give it, otherwise wayfreight crews just talk to the crew in the next town to make sure they can proceed. I try to keep up with what’s happening on the layout and be around when permissions are needed, but it’s hard to be in two places at once.
 Anyway, the West Bound Wayfreight’s first stop is the industrial district of Stevenville. Usually the wayfreight has to wait at the first stop for the the local crew to pull the required cars. This time Greg was ready well in advance of the wayfreight’s arrival. According to Brian’s train instructions he had 5 cars to drop off for the local crew to deliver to industries and he picked up 2 cars. His train was now 9 cars long.
To work efficiently he should add these cars to the appropriate block on his train so that at each town he only has to drop one block of cars. It may take a little more time to do this, but with careful planing it doesn’t take very long and saves a lot of time later. When he’s ready to go he checks for clearance to Derwin’s Drop and heads out of Stevenville
 Brian didn’t have any cars to set out in Derwin’s Drop, but he had to pick up 7. Fortunately, they were all heading to Chappellton so it was an easy task to insert them into the Chappellton block on his train. His train was now 16 cars long and definitely needed a braking helper to go down The Ridge.
The next problem was that the East Bound wayfreight from Tidewater was on it’s way up The Ridge. The West Bound couldn’t leave until they met. So the West Bound’s crew, Brian, had to wait.
The Ridge is quite a steep grade (~5%) up from Kenville to Derwin’s Drop. Helpers are usually required on the wayfreights both up and down the grade. The East Bound wsa a very long train that session and the helper, an RS2, that was cut into the middle of the train was working hard, as were the RS18 and GP35 at the head end of the train. Brian backed the West Bound into a siding so the two trains could pass each other in Derwin’s Drop.
The East Bound helper and water car were cut off just before the service track in Derwin’s Drop. They ran in there to get out of the way, temporarily. The East Bound crew backed up to connect with the rest of their train and then pulled ahead out of the way so the helper could get out to connect to the rear of the West Bound as a downgrade helper. With the way ahead clear the West Bound left Derwin’s Drop and headed down to Kenville.
Train meets in Derwin’s Drop are the busiest times on the BS&T. Thankfully I made the aisle in this area bigger than on the rest of the layout since there can be 4 or 5 operators there during a meet. It can also be quite confusing figuring out how to get two long trains past one another on passing sidings that are usually too short.
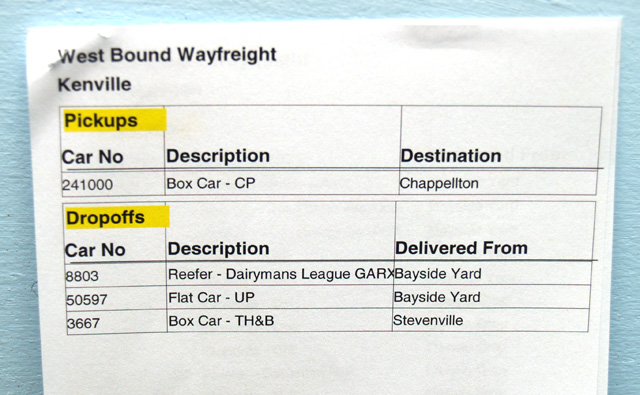
 The West Bound pulled past the switch into Kenville so the helper could be cut off. The helper then pulled into the service track. Brian backed his train up the hill, cut off the rear cars after the last car in the Kenville block, and set the brake on the cars on the hill (we use a skewer set into a slot between the rails). Then he backed the Kenville cut (3 cars) into the clear siding and left them there for the local to deliver. He picked up one car heading to Chappellton. Then he reconnected with the cars he left on the grade. His train was now 14 cars long. After he checked with the Chappellton local he headed down the line. There wasn’t much waiting here!
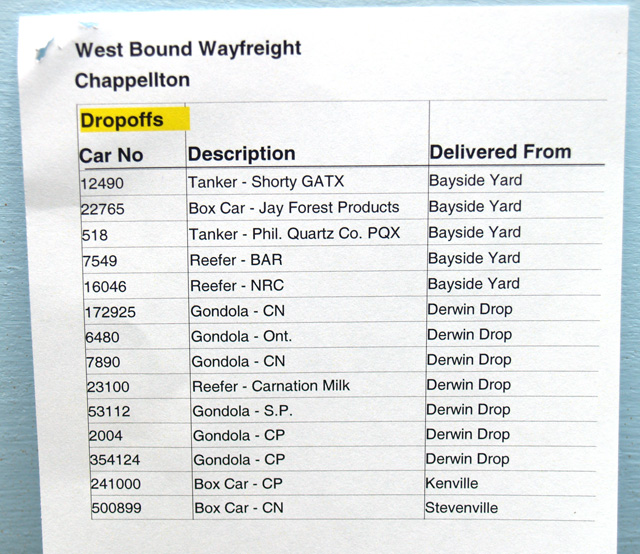
 Dropping off and picking up in Chappellton is usually quite straight forward since there are usually only two blocks of cars left on the train (Chappellton and Tidewater). In this case all the cars that Brian had were to be dropped in Chappellton, so it was extra easy. All 14 cars were dropped, giving Ken a ton of work to do!
Tidewater can be a little busy at this time because the Transfer and CN Interchange trains are usually sorting out who takes which cars. They both take cars from the yard and they swap cars between their trains. As a result the Wayfreight usually has to wait on a siding in Chappellton for a few minutes before it can run into the yard. So, as usual, Brian had to wait again.
Once either the Transfer or CN Interchange are out of Tidewater there is a free siding that the Wayfreight can pull into. The only work Brian had left was to put the cars from his train into storage tracks, put the caboose on the caboose track and run the locos into the service track. About 2 – 2.5 hours have passed since Brian first started bulding his train in Bayside.
Next time – The CN Interchange from Wholinthall.
Later!
Scott