More Progress In Stevenville

Well, I’ve done a little more work since the last Stevenville update.

There is a population in Stevenville now. I hadn’t bothered placing figures in the town until I was almost done of the major scenery work. I figured the time was right to start bringing the town to life. Here are some scenes that are developing…

sv-2007-11-25-2.jpg

A couple ladies take a break from shopping. It looks like
there are a lot of folks “just hangin’ around”.

sv-2007-11-25-1.jpg

Same scene, different angle.

sv-2007-11-25-4.jpg

Some old friends take an opportunity to have a chat in the
station parking lot, no doubt talking about the late train.

sv-2007-11-25-5.jpg

George is looking for some help with his new tub!

sv-2007-11-25-6.jpg

Bill’s doing some work on the apartment building. The
back entrance comes in real handy, but it can be messy
on a rainy day!

So, that’s the latest from Stevenville.

The next few days are going to be fairly busy so I don’t think I’ll be making a post until next week. We’re operating on the BS&T on Sunday so I’ll have a operations report early next week.

Later!

Scott

Kenville Station

It’s not completely finished, but it is close.

I’m trying to figure out a way to attach the roof so that it can be removed later to add some interior details like benches desks and wall adornments. Part of the problem is that the front of the roof is slightly warped, so I’ll have to repair that first. Hopefully one solution will solve the other problem.

kvstation-2007-11-25-1.jpg

The only thing I’ve done to the roof for aging so far is to apply some india ink/rubbing alcohol. It was a little blotchy when I first put it on, but I looked at it last evening and it has evened out as it sat.

Pictures are great to be able to show other people what you are doing. They are also great at pointing out flaws that you don’t normally see. I didn’t notice the cap shingles lifting along the top left edge. I’ll have to glue them back down and use something to apply pressure ’til the glue dries. You can also see the slight bow to the front edge of the roof line.

kvstation-2007-11-25-2.jpg

I hope to get some scenery done around the station before the next operating session on the BS&T (this coming Sunday evening). It will include modifications to the platform area to make it fit the curve of the tracks.

Later!

Scott

A Quick Look At The Development of Stevenville

I thought it might be nice to take a look back and see how Stevenville has developed over the last year and a half, or so. Well, that turned into a very long post, so I’ve condensed it into the Readers Digest version. It’s still a long post though. I’ll update this post every month or two with photos of new work

March 2006

w-dscn3743.jpg

This is the very first photo of the Stevenville area. I’m not even sure if I had named the town at this point. I certainly had no idea what it would eventually look like!

April 2006

stevenville-2006-04-09-2.jpgstevenville-2006-04-09-1.jpg

A little more than a month later. We’ve had our first operating session on the layout, only two months since starting work tearing down the old layout. I unpacked all the structures from the old layout and have them distributed around the room, but it’s a pretty meager assortment. The old layout was only about 1/3 the size of this one so it’ll take a whole lot more buildings to satisfy the local real estate market.

May 2006

sv-1.jpgsv-2.jpg

A month since the last photos. G-Mac Transfer (the blue building near the center of each photo) has been movd from Chappellton to try to balance out operations. Other than moving structures around there hasn’t been much done with scenery. I need to make sure the buildings are where I want them to be before I do too much else.

January 2007

claytonandderwin.jpgclaytoninstevenville.jpg

There wasn’t a whole lot of new developments over the summer or fall of 2006. We still operated during that time, but there are usually other activities over the summer and fall that take time away from the layout. The guys were bugging me during op sessions about getting some scenery work done, to get rid of the “ocean” look of the blue foam. So after Christmas we postponed operating for a few weeks and went to town (almost literally) doing scenery work. You can see Derwin and Clayton in the photos above working in Stevenville.

February 2007

tenement-2007-02-07-1.jpgstevenville-2007-02-07-2.jpg

frontstreet-2007-02-07-1.jpgfrontstreet-2007-02-07-2.jpg

A month later and a lot has changed! Scenes are really starting to take shape. It’s amazing how quickly a layout changes when paint and ground covers start to go down. I made some foam block buildings ( in the background) to try to fill in some empty spaces. They don’t look too bad in pictures but not so great in person.

March, 2007

tenement-2007-03-19.jpgstevenvilleservice-2007-03-01-1.jpg

A little more than a month later. I’ve been working on other areas of the layout, so there haven’t been too many changes in Stevenville. I’ve done a little work around the Tenement and put together a fueling service kit, but not much else.

April 2007

acrossthetracks-2007-04-29.jpgtenement-2007-04-29-1.jpg

In the previous month I’ve been working on other areas of the layout, but pop in to Stevenville every once in a while to do some work. These photos are some of the small scenes starting to develop in the town. You can see that the former Picard Packers factory has been moved into the downtown area to make way for a new factory.

May 2007

pp-2007-05-27-1.jpgpp-2007-05-27-2.jpg

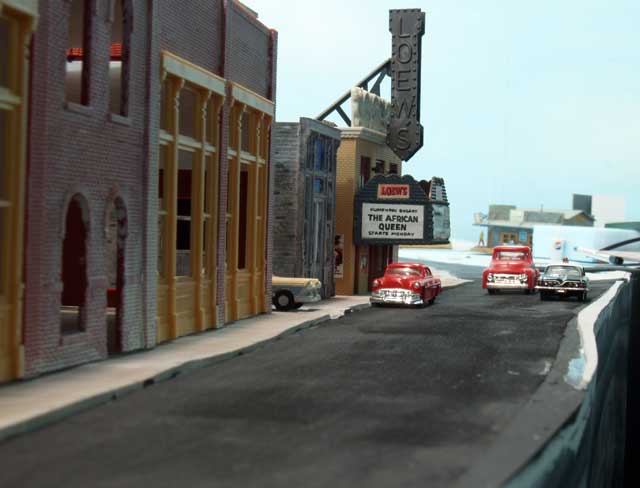
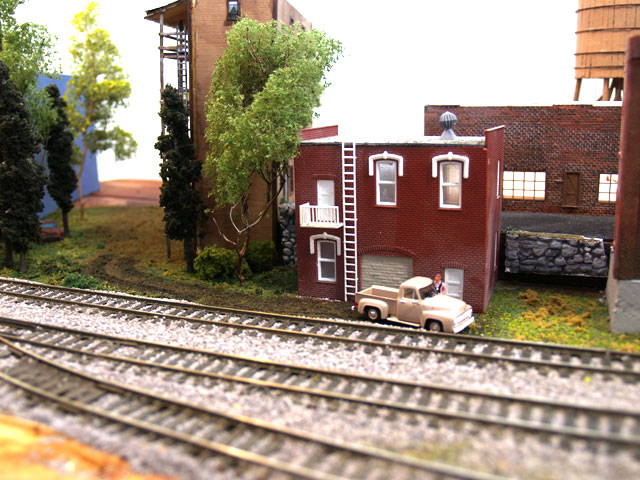
The big news during this month is that Picard Packers gets a new factory. The original building was moved into the downtown area a while ago and will serve as corporate headquarters.

November 2007

op-1.jpgop-2.jpg

Again, during the summer and most of the fall work on the layout almost comes to a standstill. I’ve only recently started some new scenery on the layout. You’ve seen these pictures in my post on the latest operating session. I have done some work here recently.

Scott

Kenville Station

Instead of working on scenery on Sunday I decided to start on a kit I picked up during our visit to Saint John last winter. It’s a small CPR Branchline Station by Kanamodel Products.

kenvillestation-3.jpg

This is my first laser cut kit. I was a little surprised to see cardboard, or “chipboard” as they call it, in addition to wood in the box. I figured the kit would be all wood. Then again, I’m used to working with cardboard.

I started by reading the directions from cover to cover to familiarize myself with the construction. YEAH RIGHT! Get a grip on reality! I jumped right in as usual! Though, to be honest, I did read a bit of the instructions – at least until I got bored with it.

I may not have read the instructions completely before starting the kit, but I did follow them closely. I’ve had too many experiences of getting ahead of myself when building a kit and then trying to figure out a way to redo something. It’s never a good thing.

So, on Sunday I got the walls shingled and assembled, the interior partially painted, and the doors and windows installed. The upper wall sections are “chipboard” and the lower 3′ are scribed wood. The shingle are Campbells paper shingle strips.

kenvillestation-1.jpg

Kenville Station as of Sunday, Nov. 18, 2007

Monday evening turned out to be a long evening helping Brian and Ted with their computers.

I got back at the station on Tuesday evening. I applied the horizontal wood trim to the top and bottom of the wood sections of the walls. Then I started working on the roof. The roof is “chipboard” and Campbells shingles. Because it is a hip-style roof there are 4 sections to shingle. I got the back side done on Tuesday.

roof2.jpg

Most of Wednesday evening was spent with the guys at Bruce’s helping him work out a yard plan on his layout. I managed to shingle the two ends of the roof before we left, and finished shingling the front section after I got home.

Next I have to find a way to hold the roof sections in their folded position to glue them. The instructions say to use weights so I’ll have to see what I can dig up.

Hopefully the next update will have a completed Kenville Station. That means that after I get tired of working in Stevenville I’ll start doing scenery in Kenville.

Scott

Stevenville – Ballast and Grass

I got the urge last Friday evening to try to finish up the scenery work in Stevenville. As usual, I went to the layout room with the intention of doing one thing and ended up doing something completely different. Unfortunately, I can’t remember what I originally went down there for!

Anyway, I started by trying to find a wall wart to power the neon “Cafe” sign I have. I couldn’t find one that put out 3 volts. I figured a fascia mounted switch on the battery pack would be almost as good. I did that and put the cafe back into place. Flicked on the switch and NOTHING. I tried it and the @#@# sign didn’t work. I mucked around with it for a while and determined I must have done something to the EL panel while try to get the wires and building into position. Crap! I will eventually get another one from Miller Engineering. BTW – They have some amazing lighting products!

So, the next thing I decided to tackle was finishing the ballast through Stevenville. I figured that would be less frustrating. I was right. Months ago I had ballasted about 1/2 the main line through town and after about an hour I had the rest of the mainline ballasted and a bit of grass along the tracks beside the tenement and down to the service shed (from the tan truck along the tracks back). While I was working in the area I put some more secure end of track devices (railway ties sunk in the ground) at G-Mac – the blue building at the left. That was it for a busy Friday evening. Sorry about the bottles and tools in the pictures.

stevenville-2007-11-18-1.jpg

After spending the whole day cutting stuff for Kim to tole paint I got back to work on Stevenville in the evening. The picture above shows the passenger siding ballasted, but I didn’t do that until Saturday evening. I started some scenery around the buildings on Front Street.

stevenville2.jpgstevenville-2007-11-18-3.jpg

This will probably be one of those times when I am temporarily obsessed with this project and will work at it every available moment until it’s done, or I get sidetracked with something else. I’ll likely have more Stevenville updates soon.

Scott

The Scrap Yard

It finally looks like GM Metals has been around for a long time. Or at least some of the junk there does. This area became the new home of some of the trees I made up for the Truro show.

You can just barely see Dickie Clothing through the dense canopy. The big notch at the left is where my lift-out bridge fits in. I need to get more junk, although Kim says I have enough junk now! Ha!

Scott

Conifers


These are some conifers I made to use on my modules during the Truro show. I “planted” them on “The Ridge” after the show.


These trees were relatively easy to make. I will take picture of the process sometime over the next little while and create a “how-to” to post here

The fire tower was the first structure I ever scratchbuilt. Being an ex-forestry guy it seemed like a natural thing to make.

Scott

A Service Shed

This is a little shack I built for the service track in Stevenville a while back but haven’t highlighted yet. It took about two evenings to build and paint. It is constructed out of mat board, scale lumber. The roof is plain mat board covered with paint and a facial tissue, then weathered. The windows and chimney are from Grandt Line. Total cost… about $5

The equipment details (compressor, pump house, tanks, etc.) are lead bits from Woodland Scenics.

The little shack adds a nice bit of detail to the area.

Looks like early morning in Stevenville as the local crew gets ready to start a busy day switching businesses in the industrial section of town. There are lots of customers in Stevenville and Charlie and Fred have their work cut out for them today. Picard Packers and Dickie Clothing have big shipments ready to go, so they’ll need lots of empties dropped off and loaded cars pulled out of the way.


After a long day Charlie’s looking a little sore. He’s been up and down out of the cab quite a few times today and his back has about had it. Being a brakemen in a busy industrial area is hard work. He’s not looking forward to having to do it all over again tomorrow.

Later!

Scott

Tidewater Gets a Backdrop

You may have noticed the backdrop in the previous post about the new 0-8-0. Here are a couple more views of it.


It is from SceniKing. I think it looks great. Not glossy like some photo backdrops I’ve seen and just the right level of detail for a backdrop. There can be too much detail, which will draw visitor’s attention away from the models.

One thing that completely surprised me is how close the sky in the backdrop matched the paint I used on the wall. I wish I could say it was good planning, but it was more like great luck!

I still have to ballast the yard and will add grasses and such to blend the backdrop into the foreground. Brian had a great suggestion to help blend things in even more – add 3 dimensional loading docks at the doors on the backdrop where space permitted. I’ll definitely give that a try.

Scott

The New Trees

Well, the new trees turned out better than I had hoped. They received quite a few comments from the folks at the show.

The view looking down the road toward BigFoot Bridge.

In addition to the deciduous trees I was able
to create about 7 conifers.

Greg rerails a car at Hazard Bend.
The name is well deserved.

Perhaps I should start selling trees at shows? The only problem is that I like them so much it would be hard to part with some of them. But, if the price is right….!

Scott