I’m trying a new module connection method that I saw in Springfield and read more about on the internet.


It’ll gets it’s first real test when we set up for a Boy Scout fundraiser in a couple weeks.
What do you think?
Bayside & Tidewater (BS&T)
![]() Here are some links for more information in followup to the clinic I gave at the MFMR Convention on May 14, 2011.
Here are some links for more information in followup to the clinic I gave at the MFMR Convention on May 14, 2011.
JMRI is a very useful tool for anyone using Digital Command Control. In it’s basic use JMRI – DecoderPro is a godsend for programming DCC mobile decoders. I really don’t know how folks not using DecoderPro get along. I have one loco Proto RS-11 with QSI sound that “loses it’s mind” every now and then during an operating session. Since I have the settings for all my locos stored in my DecoderPro roster file it takes only a minute or two to set the loco back to my customs settings and it’s back in operation on the layout.
Since the introduction of WiThrottle – a server and application combination – there has been a revolution in wireless throttle technology. Now we use our iPhones, iPods, and Android phones as throttles when we operate. The great thing about it is that our throttles are now universal – they will work on any DCC system as long as it has a computer interface, DecoderPro, and a wireless home network.
Anyway, on to the “more information” part of this post.
| JMRI web site – http://jmri.sourceforge.net/
At the moment 2.10 is the stable production version. 2.11.4 is the current test version. In my experience it is relatively safe to install the test versions to take advantage of new features, but beware that there may be issues. If you do have problems with a test version you can always reinstall the previous version. |
DecoderPro Manual – http://jmri.sourceforge.net/help/en/manual/index.shtml
With the rapid development of JMRI this manual is almost always out of date. But it would certainly help for basic/older features. |
| JMRI Yahoo Group – http://groups.yahoo.com/group/jmriusers/
A great resource when you are really stuck. The developers of JMRI check the group daily – some several times a day. If you ever have a problem or question this would be the first place to ask your question. |
Other JMRI Clinics – http://www.rr-cirkits.com/Clinics/Clinics.html
A collection of other presentations on most aspects of JMRI. If you are into automation, dispatching, or remote control this is a great resource. |
| JMRI on YouTube – http://www.youtube.com/results?search_query=jmri
Lots of great (and some not so great) videos about how folks are using JMRI – from the basic to advanced. |
My Presentation – Click here
Probably not as good as many of the other presentation you’ll find on the internet, but it does have some links to neat videos of JMRI in use. |
I’ve always envied modelers that have an endless supply of kits and supplies. They always have something to work on. Unfortunately some of them are just collectors of kits and never build anything. Still, I’m in awe when I see stacks of unbuilt kits and drawers full of detail bits in someone’s work area.
I haven’t gotten to that point yet, but I do have a drawer or two in an old dresser that have several unbuilt items. I’ve been looking through those drawers quite often lately in my exercise to have the layout “done” for the MFMR Convention in May. I need structures! Chappellton hardly looks like a town and it’s supposed to be a city. I need buildings – short and tall, fat and wide. Brown buildings, red buildings, purple buildings – I don’t care!
Oh, and I need trees too. Lots and lots of trees. I doubt if I’ll get time to make any before Convention so I’ll have to make do.
 So, what’s my next build? Why, a tug boat of course!
I heard a while ago that Frenchman River Model Works had released a 92′ Railway Tug. When I was asked to review it for Scratchbuilder’s Guild I nearly flipped. The little 45′ Tug I reviewed for them last year just wasn’t cutting it in Chappellton. The poor little thing was severely overworked! So I jumped at the chance to build the “big brother”.
It arrived today and I hope to get started this evening. I’ll make a post here when the review is complete and available at Scratchbuilder’s Guild. After taking this photo I realize I have some barge building to do as well.
I haven’t opened the box yet. I’ll leave that for this evening.
Scott
 After a long break this project is back off the shelf. I spent some time the other evening putting some signs on the sides of the building. Visit Scratchbuilder’s Guild to see the process I used to make and apply the signs.
The next step will be to install the “glass” and figure out some way to make a decent looking interior without actually modeling an interior. I think that computer graphics software will play a key role once again.
This building will be a nice addition to the city scene I imagine being in Chappellton. Only about 2-1/2 months before it has to be ready for the MFMR Convention open house I’m hosting. There’s a lot of work to do!
Must get back to work…
Scott
Ok, so we’ve had some problems with our sound decoders since we installed them a few weeks ago. If you missed that post – here it is.
Anyway, Derwin’s loco lost all engine noise, but other sounds like horn and bell worked. Both of mine were fine until Derwin ran one of them during an operating session. The result was no engine noise, but bell and horn would work. The commone denominator – Derwin – as usual! HA!
I reprogrammed my loco (thank God for DecoderPro) and it worked fine. The same fix didn’t work for Derwin unfortunately. Then I got an email from Daniel Watkins thanking me for my post on installing these decoders. After an exchange of a few emails we discovered his loco had a very similar problem.
So, the power of the public press came to the rescue. I sent an email to MRC on Saturday. I did not expect a reply until Monday or Tuesday. However, when I turned on my computer Monday morning there was an email from Frank waiting for me. Wow – I was impressed. Here is Frank’s response…
Scott,if you have horn and bell sounds but nothing else it is possible you inadvertently shut off the prime mover soundsdid you try double clicking the headlight button, [F0] as we use this as a mute, and also F12 is the sound on/off mute or try playing with CV # 49 to see if you can get the sounds back onif all eles fails send me the decoder, [no money] and i’ll check it out for you.Frank
I know it has been a long time since my last post. I have been busy getting my business going. The good news is that my business plan is complete and it’s full speed ahead trying to make some cash.
 I did take a break from work this weekend. I had ordered two MRC 1663 decoders made for Atlas S2’s and S4’s and picked them up yesterday. I installed one last night and the other one this afternoon. I took a little more time this afternoon and took a bunch of pictures to show the install.
 The loco I chose for this decoder is the first Atlas S2 (I think) that I bought. I can’t remember what it was painted for originally but I stripped it and started a paint job on it years ago and never did finish it. This was one of the first locos I installed a decoder into – long before NCE started producing their replacement decoder made for these locos. I put a Digitrax somethingorother decoder in it and squeezed it into the cab. It was a tight fit. I used the NCE decoders in two other S4’s and it was a much simpler install.
Anyway, back to the MRC decoder…

After I stripped out the old decoder I was left with this. I test fit the new decoder and, as they say in the instructions, I would have to grind a little off the rear end of the weight to fit the speaker. Some folks say to just remove the top weight and install the decoder, but I decided to leave it.
 The loco I did last night was a used one I had picked up at a show a couple years ago. It had an old Lenz decoder in it and the previous owner decided it didn’t need the top weight. When I put the MRC decoder in it there was nothing to grind so the install went very quickly. There isn’t a whole lot of extra weight to the top section anyway, so you could just leave it off.
 This photo shows where the clearance problem is. In order to insert the screw to hold the decoder in place the speaker needs to move about 1/16th inch toward the front of the loco. I took out my trusty Dremel and a suitable grinding wheel and went to work. I did this well away from the loco so that there was no way any of the fine material would get into the motor.
I worked slowly so I wouldn’t take off too much. I didn’t want it to be a hack job. It didn’t take long to trim off just enough so that the screw hole lined up perfectly.

This photo show just how much I had to take off. You can barely notice the indent in the weight, but it was enough. I was about 10 minutes into the job at this point.
 The next step was to put the weight back into place and add some electric tape on top to insulate it from the bottom of the decoder. I’m not sure this step is necessary since the bottom of the decoder looks like it is already coated with insulating material, but it says to do this in the instructions and it is better to be safer than sorry later.
 There is a tab on the bottom of the decoder that makes contact with the top of the motor. This tab is one of the contacts to supply power to the motor and must be bent at an angle to assure good contact. The other power contact for the motor is made through the screw that attaches the decoder to the locomotive.
 After I put the decoder in place on top of the weight, tightened up the screw, and soldered the pickup wires the installation is complete – Only about 20 – 25 minutes after starting the job. The only soldering that was required was to attach the 4 pickup wires that bring power from the rails to the decoder. The solder pads for these wires are a little small but clearly marked and easy to solder to. The decoder sat up a little on the speaker end, but flexed back down when the shell was installed. I think the tab to contact the motor on the bottom of the decoder might have been the cause. I then put the locomotive on the programming track to make sure all was well and then put the shell back on.
I use DecoderPro to program all but the address of my locos. The software makes it very easy to program decoders, especially sound units. So I fired up my 12 year old laptop that I use for this purpose and explored the decoder to see what it could do.
 As I expected from previous experience with MRC decoders, there are very few speed options. They are fine if you run the loco by itself, but it is very difficult to speed match locos for consisting.
 I also found that in order to get the loco to just barely start to move at speed step one I had to adjust the start voltage quite high. Then when I tried to set the top speed I had to bring the max. voltage wayyyy down, but if I brought it too far down the start voltage would mess up. So, in the end I decided that good slow speed adjustment was more important than a lower top end and set values of 11 for start voltage and 20 for max.
 Another thing I didn’t like about these decoders is the coarse volume adjustment. Other sound decoders I use have very fine adjustment of volume, but these decoders have only 4 settings – from 0 – 3. Setting 2 and 3 are way too loud for my liking. Setting 1 is a little too loud, but livable.
One other thing I didn’t particularly like was that I couldn’t get the decoders to program on the main. It very tedious trying out various CV settings to see how they affected the decoder – moving the loco from the programming track to the main track several times while making adjustments.
Other than those things it seems like a pretty good decoder, especially if you don’t plan on consisting the loco. If you do be prepared for a lot of give and very little take. I’ll likely not put either of these two into a consist, but I might give it a try.
In the end I think the MRC 1663 is worth the money. It would be difficult to add sound to an Atlas S2 or S4 using most other sound decoders without a lot of work and modifications.
Later!
Scott
I neglected to mention that on a new install there is a metal screw through the bottom of the frame into the motor. The NCE ATLS2/S4 decoder includes a nylon screw to replace the metal one to isolate the motor from the frame. It also includes Kapton tape to be put under the motor to further isolate it from the frame. The MRC decoder includes neither, but I have read that you can buy nylon screws and that some people have used a small amount of rubber adhesive to secure the bottom of the motor. In either case, the bottom side of the motor must be isolated from the frame.
Scott
I guess I was in an organizational mood over the weekend. In addition to the throttle holder I decided it was time to make something to hold the pencils and uncoupling skewers that are usually found scattered over the layout. A pencil sitting in the middle of a well detailed scene can really take away from the ambiance!
Again, I decided to see what I could come up with using only the wood scraps scattered around my woodworking shop. Hmmmm… I notice a trend – stuff scattered around the layout and stuff scattered around the shop. Yes, I should organize my workshop better, but I prefer to work on the layout.
Anyway, this is what I came up with (click the image for a larger view)

It is hard to see since it blends into the valance, but it is a small block of 3/4″ pine with a smaller piece of 1/4″ ply glue to the top. There are two holes drilled in the 1/4″ piece for the uncoupling skewers (I had to add tape to the top so they wouldn’t fall through) and a large hole drilled almost through the 3/4″ piece the size of the pencil. Now there’s no reason for any of that stuff to be on the layout. Hear that guys!!!!
Scott
It seems there’s a throttle holder shortage in the market these days. We used to be able to buy an adjustable cell phone holder at the Dollar Store, but they have not been available for some time. I’ve looked for them in dollar stores in 3 provinces but have not found them anywhere. You can buy them, and similar items, in other stores for $10+ each, but I’m not willing to spend that much money for all the holders I would like.
The other day I was in my woodworking shop cutting some large pieces of 1/4″ plywood into many smaller pieces for Kim to tole paint (Christmas decorations). As I was cutting her stuff I decided to build a throttle holder with the scrap pieces of ply. This is what I came up with (click the image for a larger view).


It is a very simple design and only took about 15 minutes to cut and put together. I estimate it cost about $1 for the wood required, but since it’s just scraps anyway I really consider it free. I will be making more as the scraps become available.
Scott
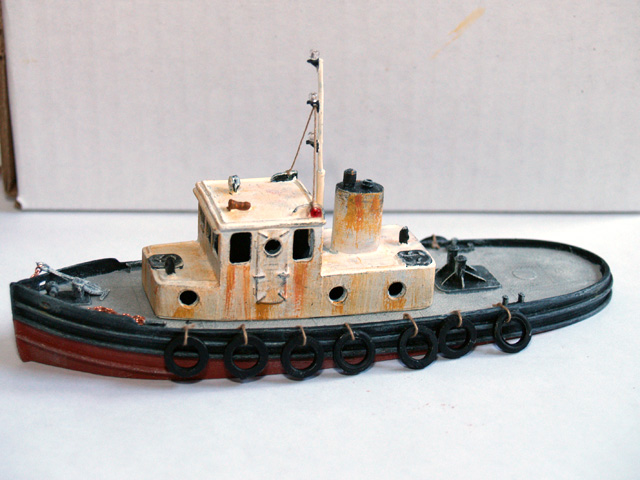 Chappellton Harbour got a new addition over the weekend – a 45′ Tug from Frenchman River Model Works.
You can read about assembling this kit at the Scratchbuilder’s Guild.
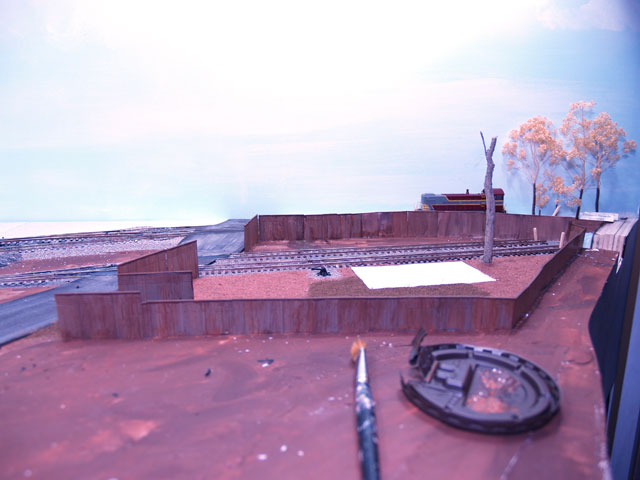
I needed a tug for the car float in Chappellton and this kit looked like a great choice. However, after I placed it in position it looks very small next to what I was going to use as a starting point for the car float. So, I either need a larger tug, or a smaller car float.
It might not be so bad after I pour the epoxy to simulate water. I will leave the float where it is and remove the tug. I’ll pour the water to about 1/4″ thickness. Hopefully the tug will appear larger next to the float when I put it back in place.
What do you think?

Scott
I just added a new post over at The Scratchbuilder’s Guild about making quick and easy fences. You can check it out by clicking the image…
Scott
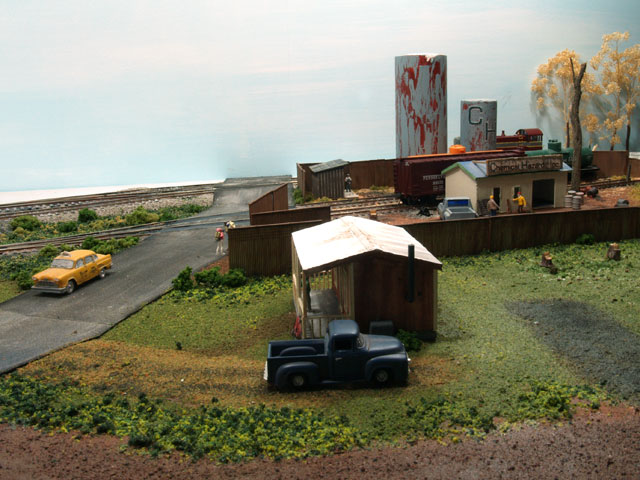
(March 13, 2008: Here’s what the area looks like after the scenery is almost complete. Click an image for a larger version.)